I Love Squash, Squashy, Squash, Squash: Tomato Basil Spaghetti Squash with Parmesan

I love squash, squashy, squash squash…or is it scotch that I love…hmmm…either way this baked spaghetti squash recipe is da bomb!

Tomato Basil Spaghetti Squash

Spaghetti squash is totally one of the best vegetables out there! It’s just so damn versatile; it can be your meatless main, a great side, and it has a built in container! Like what other vegetable can even say that?!

The only downside for me as far as spaghetti squash goes is how much I love roasted spaghetti squash vs. how long it can take to roast spaghetti squash. Sometimes roasting for 45 minutes + is just not an option but now-a-days (am I old enough to say things like now-a-days?) there are tons of great recipes for your slow cooker or even the microwave that can cut your cook time way down – so no excuses, make this Tomato Basil Spaghetti Squash with Parmesan RIGHT NOW! For 2-4 servings you’ll need:

  • 1 Whole Spaghetti Squash
  • EVOO
  • 1 Small Onion, Chopped
  • 1-2 Cloves of Garlic, Minced
  • Tomatoes (whatever kind is on sale is fine but the cherry tomatoes are nice for a splurge), quartered or halved, or leave some whole – no worries!
  • ¾ C Parmigianino Reggiano, Grated (this is great recipe to use really good cheese in – none of that pre-grated crap please! If you’re not sure what constitutes really good cheese go visit the folks at Paddy’s Cheese, tell ‘em I say “Hi!”.)
  • ½ C Fresh Basil, Chopped
  • 2 tsp Tomato Paste
  • 1 tsp Balsamic Vinegar
  • Salt and Pepper to taste

If you have the time I definitely love roasting the squash, to do that preheat your oven to 375, cut the squash in half, drizzle with EVOO and season with salt and pepper. Place cut side down on a baking sheet and roast for 45 minutes – I actually like to flip them a couple times as they cook so the cut side can get some browning action as well.  You’ll know it’s cooked when you run a folk across the flesh and the strands pull away easily. Let the squashes cool while you make the sauce.

Spaghetti Squash

Heat some EVOO in a pan over medium heat and sauté the onion until just translucent, add in the garlic and cook for a minute or two. Add in the tomatoes and let them kind of wilt and burst, a few minutes more, then add the balsamic, salt and pepper. Add the spaghetti squash strands and the tomato paste and toss to coat everything.

Tomatoes

Right before you serve add in the basil and the Parmigianino Reggiano, garnish with a little extra basil (and maybe another sprinkle of parm if you’re nasty!).

This reheats like a dream so make a big batch and you’ve got lunches for the week!

Cheers!

Baked Pumpkin Spice Doughnuts

I ain’t done with pumpkin spice just yet!

You may recall my recent confession in the Bourbon Molasses Apple Pie post that I am not much of a baker, however; after my apple pie fail I was on a quest for redemption! I scoured Pinterest for a recipe that could turn this hot mess into a baking goddess (you like that rhyme eh? Not gonna lie that one took me a while to come up with). It needed to be a straightforward, no nonsense kind of recipe that could mend my broken spirit and impress a special dinner guest.

Friends, I found it! Redemption tastes sweet (and cinnamon-y…YUM)! My attempt at Cooking Classy’s Pumpkin Doughnuts was a raging success! These doughnuts have a moist cakey texture which I love and were delicious on their own OR with some of my fave Cococo Chocolatiers gelato.

Doughnuts Stack

Here is what you’ll need to whip up a batch of Baked Pumpkin Spice Doughnuts and impress the pants off of your friends:

  • A doughnut baking pan ($15 – 20, available at most specialty cooking store…and probably Winners)
  • 1¾ c + 2 Tbsp All Purpose Flour (Why the 2 extra tablespoons you ask? I have no idea, just go with it!)
  • 1¾ tsp Baking Powder
  • 1¼ tsp Salt
  • ¾ tsp Cinnamon
  • ½ tsp Nutmeg
  • ½ tsp Powdered Ginger
  • ¾ c Brown Sugar (Packed)
  • ½ c Canola Oil
  • 3 Large Eggs
  • 1½ c Pumpkin Puree
  • 1 tsp Vanilla Extract

For the Cinnamon Sugar Coating

  • ¼ c Sugar
  • 2 tsp Cinnamon
  • 2 Tbsp Melted Butter

Here we go, I’m so excited I can barely contain myself!

Preheat that oven to 350 and grease up your doughnut pan (this will make about 16-18 doughnuts, I only have one pan so I did them in batches).

Shift together the flour, baking powder, salt, and spices in a medium mixing bowl.

In a large mixing bowl whisk together the ‘wet’ ingredients; brown and regular sugar (I know, technically not “wet”…this is why baking and I don’t always get along), oil, eggs, pumpkin, and vanilla. Mix until smooth, no clumps please.

Add the dry mix to the wet, I like to do this slowly so dump in about a 1/3 of the dry and mix to combine, then another 1/3 and mix, and then the rest and mix it all up until smooth.

To fill the doughnut wells spoon the batter into a large plastic bag and snip of a bit of the corner . Squeeze about a ¼ cup of batter into each well (they’ll be around ¾ full).  Bake for about 15 minutes.

While the doughnuts are baking mix together the cinnamon and sugar and set aside.

Remove doughnuts from pan (a good whack should do it) and place on a wire rack (or plate…whatevs) to cool.

Once the doughnuts are mostly cooled you can brush the tops with melted butter and then press into the cinnamon sugar.

And that’s all she wrote…BOOM!

Cheers!


Meatless Monday: Lemon Ricotta Pasta with Mint & Edamame

I just want to make one thing clear here – I LOVE meat! I know I’ve been rockin’ a lot of meatless dishes lately but I am no vegetarian. I love bacon and steak and roast chicken and spicy salami and burgers and I could go on but your time is valuable so I’ll get to the point.

Point is, you can love meat and not eat it at every meal, not only is this healthier (as long as you keep in mind that getting protein from other nonmeat sources is still super important!) but I actually find incorporating more veggie meals cheaper as well.

My (world’s greatest!) Dad is more of a “meat and potatoes” kinda guy so I grew up eating lots of meats and more traditional meals, it’s a bit of a foodie adventure for me to explore the different kinds of meatless dishes out there and this is one of my absolute faves!

I’ve been making this dish for years and it’s become one of my main go to meals. I love the creamy ricotta contrasted by the crisp mint and fresh lemon. Weirdly, one of my favorite things about this recipe is the sound it makes – when you’re stirring everything together just have a listen; that smacking sound of creamy pasta = sublime!

Lemon Ricotta Pasta2

Here’s what you’ll need for 4 servings:

  • Any Kind of Pasta (about a ½ Cup or 2 oz. per serving)
  • 2 Cups Ricotta
  • 1 Lemon, zested
  • Mint, chopped
  • Green Onion, chopped
  • 2 Cups of Frozen Edamame or Peas
  • Parmesan

This dish comes together in a hot minute so get everything ready while you are waiting for the pasta water to boil, which brings me to step one…cook pasta according to package direction and reserve a cup of the cooking water.

Place your frozen edamame in the bottom of your strainer and then drain the pasta over top (pretty smart huh!). Toss the works into the hot pot (taken off the heat), mix in your ricotta, lemon zest, a squeeze of lemon juice, and some of the pasta water and give everything a stir. Season with salt and pepper (you might want to go heavier on the salt, I find ricotta needs a little extra zip) and mix in a few tablespoons of mint and green onion just before you serve.

Garnish with some grated parmesan and another sprinkle of mint.

Lemon Ricotta Pasta

Don’t be afraid to change it up either – don’t have mint? Basil would be delicious! Not a fan of peas? How about some chopped tomatoes? Use recipes like this as a template for flavours you love (or have on hand) and have some fun with it, gawd it’s just dinner people!

Enjoy!


If You Don’t Like Fall, I Don’t Like You: Homemade & Healthy Pumpkin Spice Cuppa

It’s officially fall (aka pumpkin spice season) and I couldn’t be happier!

I know some folks out there are “over” the pumpkin spice trend but seriously give your head a shake! Nutmeg, cinnamon, ginger, allspice, cloves…all delicious, combining all of those things…SUPER MEGA DELICIOUS! Embrace the pumpkin spice!

Now, don’t get me wrong because I’m a fan of the Starbucks PSL but you know just as well as I do, that shit is so not good for you! Look it up – 52g of carbs, 240mg sodium, 49 g OF SUGAR (not to mention Starbucks won’t share with the world the ingredient list…), and 380 calories of deliciousness. The good news is you can whip up a super healthy version at home and impress the hell out of your peeps by serving up this Homemade & Healthy Pumpkin Spice Cuppa.

PSL

It’s crazy easy, take about 10 minutes, and literally tastes like pumpkin pie in a cup. Here’s what you’ll need for 2 servings:

  • 2½ c of Milk or Non-Dairy Milk (I use almond milk)
  • 5-6 Tbsp. of Pumpkin Puree (not the Pumpkin PIE stuff, the real, natural pumpkin stuff)
  • ½ tsp. each of any combination of the following (total of 2 tsp) :
    • Ginger
    • Cinnamon
    • Allspice
    • Nutmeg
    • Cloves (go a little lighter on the cloves, they are potent)
  • 1 tsp. Vanilla Extract
  • 1 Tbsp. Maple Syrup (the good stuff please, we live in Canada after all!)
  • Whipped Cream (or not – you decide)

Combine all the ingredients in a sauce pot and whisk until smooth (and I mean real smooth!). Bring the mixture to a simmer over medium heat, stirring frequently so nothing burns to the bottom of the pot. Let it simmer for a few minutes and give it a taste, feel free to add in a little more of anything that you like.

Need a little spice in your life? Add a pinch of black pepper or cayenne for an extra kick. You could also add in a shot of espresso or some strong coffee if you’re jonesing for your caffeine fix.

Serve with the whipped cream (if using) and a sprinkle of cinnamon.

Click here to check out my inspiration for the recipe!

At this point you may be wondering to yourself, “what if I wanted to try this Pumpkin Spice Cuppa but also wanted to get drunk?” Easy my friend, add in some brandy or whiskey and remember the first step to solving a problem is admitting you have a problem. Kidding, I 100% support all kinds of warm alcoholic beverages – go on with your bad self!

Cheers!

Looks Good Enough to Eat (But Looks Can Be Deceiving): Bourbon Molasses Apple Pie 2.0

I have a deep dark secret that I need to share with you; I am a God awful baker, seriously…like I just can’t even!

At various times in my life I have tried to be more baker-y but honestly 98% of my baking attempts do not turn out – and unfortunately this would be delicious Bourbon Molasses Apple Pie was no different. She may LOOK tasty but don’t be fooled – inside she was a runny, soupy mess…obviously I missed my calling as a food stylist though!

Apple Pie

I wanted to share this not only because I truly do think the flavours of this recipe are great but also because who doesn’t love a good food fail!. I also don’t want to make it appear that everything I make is always amazing and delicious, and that I poop rainbows (ouch!). This is not the case! I have made many ‘Pinterest fails’ and my poor fiancé has had to force down more than his share of recipes gone awry (usually dosed in hot sauce because that is what I do when I don’t know what to do).  Sometimes you just have to say, “screw this, I’m ordering pizza” and that is more than OK!

Despite my baking shortcomings I still believe this pie could be da bomb so after consulting with my baker extraordinaire pal the Edible Woman I have come up with this revised recipe that will warrant you significantly better results.

For Bourbon Molasses Apple Pie 2.0 you’ll need:

  • 1 box Pillsbury Pie Crust
  • 4-5 Apples, Granny Smith is traditional but any tart/sour apple is good, thinly sliced
  • 2/3 Cup Brown Sugar
  • ¼ c Milk
  • 2 oz. Bourbon
  • 2 Tbsp Molasses
  • 1 Tbps corn starch (this is where I went wrong, I used flour originally and not enough of it!)
  • 1 tsp cinnamon
  • 1 tsp nutmeg
  • 1 tsp ginger
  • Pinch of salt
  • 1 Beaten Egg

Preheat your oven to 400 degree.

Thinly slice your apples (you can peel them if you want, I don’t bother because I’m lazy), then whisk the sugar, milk, bourbon, corn starch, spices, and salt together in a bowl. Add the apples to the mixture and toss to coat.

Next prep your pie dish, I like to grease mine up a little just in case and then lay in your pie crust. Gently form the pie dough to the dish and then fill that with your apples.

For the pie crust you can either cover the apples completely with the dough, crimping the edges and slicing in a few ‘vents’ or you can try the lattice style pie crust that I did – here are some great step by step instructions!

Lastly you need to brush your pie with the beaten egg – this will help the dough really crisp up and turn that beautiful golden brown colour. Pop your pie in the oven for 35-45 minutes until the crust is browned and the filling is bubbly.  Make sure you let this guy cool for a while; this will also help all the juices ‘tighten up’ a little so when you slice into it you don’t have the same heartbreaking disappointment I had.

I like to serve my apple pie with a scoop of vanilla ice cream AND a slice of cheddar cheese…you heard right, cheddar cheese. The cheese is something I picked up from my days working as a server at an old folks home  so I guess it’s a little old school but I tell ya – Grandma knows a thing or two about whipping up an apple pie so don’t question that shit!

Cheers!


Meatless Monday: The BEST Baked Falafel

I know what you’re thinking, “really Linds…the best baked falafel…the best?” Yes, THE BEST falafel I have ever put in my mouth – don’t patronize me!

Before this recipe I wouldn’t have said I was a big fan of falafel. When I’d tried it in the past I would find it dry and not particularly flavourful unless it was dosed with tzatziki. But one day I came across this recipe from How Sweet Eats and I don’t know what came over me but I just felt like this was IT, the falafel I’d be waiting for my entire life…and I was right! This is some life changing falafel!

falafel

Even if you think you don’t like falafel give this recipe a go – it’s quick and actually kind of fun to make AND you can make a super cool falafel ‘bar’ like I did and have some fun building your own delicious falafel sandwiches. Here’s what you need for this home run Meatless Monday dish:

For the Falafel:

  • 2 (14 oz) Cans of Chickpeas, drained and rinsed
  • 3-4 Cloves of Garlic, roughly chopped
  • 4 Green Onion, roughly chopped
  • 1 Large Egg
  • 1 Lemon, zest and juice
  • Big Handful of Parsley
  • Big Handful of Cilantro (could use mint instead if you’re not into cilantro)
  • 1 Tbsp EVOO
  • ½ tsp Cumin
  • ¼ tsp Cayenne
  • Salt and Pepper, to taste
  • ¼ c Whole Wheat Flour
  • 1 tsp of Baking Powder

For the Falafel Bar:

  • Mini Pita Pockets
  • Feta
  • Romaine Lettuce, shredded
  • Tomato, sliced
  • Cucumber, sliced
  • Red Bell Pepper, Sliced
  • Tzatziki
  • Hummus

Alright, that might seem like a lot of ingredients but it’ll be totes worth it, I promise!

Preheat your oven to 425 degrees.

Throw your chickpeas, green onions, garlic, egg, lemon zest and juice, oil, herbs and spices into a food processor or blender and pulse until you get a crumbly mixture that still has some chunkiness to it. Add to that half of the flour and baking powder and pulse until combined then toss in the rest of the flour and baking powder whizzing everything up until smooth-ish, you can also leave this a little chunkier if you prefer.

Now all you do is line a baking sheet with foil or parchment and form the mixture into balls with your hands (I used a super heaping tablespoon amount) – this is messy so take of your jewelry and enjoy it! If you have the time I like to chilled the formed falafel in the fridge for 15-20 minutes so they can firm up a bit (this is also a great opportunity to fix yourself a cocktail) but if you’re short on time you can skip this step.

Now bake these guys for about 10 minutes per side, I like them to have a nice crisp on the outside so to help them brown up a little more I drizzle with some EVOO before I pop them in the oven.

falafel bar

While the falafels are baking you can cut up and arrange your accoutrements and then serve with the warm falafel.

Cheers!

Make Ahead Healthy Egg White Breakfast Bagel

They say a meal without alcohol is…breakfast – this is sad but true (generally)! Despite this, I am a HUGE breakfast fan and I am a little obsessed with make ahead, grab and go type breakfasts. I love being able to prep an entire weeks’ worth of breakfasts on a Sunday and get a little extra beauty sleep during the week.

I’m always looking for fast, healthy, easy, delicious breakfast options and my latest creation, the Healthy Egg White Breakfast Bagel checks all the boxes!

Breakfast Bagel

Here’s how to make an entire weeks’ worth of breakfasts for two people in less than an hour! You’ll need:

  • 10 Weight Watchers Whole Wheat Bagels or Dempsters Thin Bagels (hey, they’re ‘healthy’ after all)
  • 1 lg. Carton of Egg Whites
  • 1 Package of Laughing Cow “Cheese” (I used the jalapeno flavour…zesty)
  • 1 Bag of Spinach
  • 2 Tomatoes, sliced in half moons
  • 1 Cucumber, sliced in half moons
  • Donut Pan (yes, that is a real thing) or 9”x13” type of baking pan

Preheat your oven to 400 degrees.

Fill you donut pan (or regular baking pan) with some eggs white. How much you fill it is really up to you, the eggs won’t puff up very much so pour in enough egg white to reach your desired thickness of baked egg…which sounds gross somehow…but it will be delicious! Season your eggs with salt, pepper, whatever you like and DO NOT forget to grease your pan with EVOO – these eggs are not going to want to come out of your pan so you really need to make sure you’ve got some oil in there!

Bake your eggs for about 10 minutes, until they are set/not very jiggly.

While you’re waiting for you oven to preheat/eggs to bake you can prep your veggies, slice the tomato and cucumbers, and start toasting your bagels.

Once you have a toasted bagel you can start to assemble. I spread both sides with some if the Laughing Cow “Cheese” and then layer some spinach and tomato on the bottom side of the bagel. On the top side of the bagel I put down a few of the cucumber slices and season all that with a small pinch of salt and pepper. Once you’ve gotten your eggs out of your pan (if using the donut pan I used a small spoon to help wedge mine out. If using a regular pan just cut the egg into 10 even pieces and remove with a flipper type utensil) place them on top of the tomato and top off with the other half of the bagel. Repeat 9 times! I wrap each one in tin foil (sorry environment) and store in the fridge all week for a quick, delicious, and filling breakfast.

Happy Friday Ya’ll, Cheers!

Meatless Monday: Corn & Zucchini Cakes

I am such a sucker for fall! As much as I love the summer months in YEG there is something about September, it’s like a fresh start for the year. But what I love MOST about this time of year is the harvest; the markets are just packed with veggies, the colours so vibrant and fresh – I’m getting a major foodie boner just thinking about it!

Fall is the best time to think about cooking with local ingredients because there are a butt load of them! One of my favorite things to eat this time of year is corn, specifically Alberta Taber corn – which you can literally buy on the side of the road. I was trying to think of something unique to do with corn for a recent Gastropost Challenge but I wanted something  that tip-toed along the line between summer and fall flavours and that’s when I was inspired by a recipe from Damn Delicious. With a few tweaks my Corn & Zucchini Cakes were born.

Corn and Zucchini Cakes

Here’s what you need to whip of a batch of these crispy and sweet cakes tonight:

  • 2-3 Medium Zucchini, grated
  • 2½ Cups of fresh Taber corn (frozen or canned would work as well)
  • 4 Eggs, beaten
  • ¾ Cup Whole Wheat Flour
  • ¼ Cup of Cheddar Cheese, grated (feta would also be delicious)
  • 1 Clove Garlic, minced
  • 2-3 Heaping Tbsp of Fresh Basil
  • 2-3 Heaping Tbsp of Chives
  • Zest and Juice of Half a Lemon
  • Salt and Pepper to Taste (I go heavy on the pepper, I love black pepper and corn)
  • EVOO for Frying
  • Small Container of Ricotta

First things first, get your grated zucchini into a colander (placed in the sink) with a healthy pinch of salt. Stir, and let that hang out while you prep the rest of the ingredients.  Mix together all the ingredients EXPECT the zucchini, EVOO, and ricotta.

Heat a skillet coated with a thin layer of EVOO over medium heat.

Using a clean kitchen towel or some cheese cloth if you have that handy squeeze all of the liquid from the zucchini by placing the zucs onto the cloth and kind of ringing it out like you would a towel (or the neck of your next door neighbour who insists on beginning any and all construction projects at 7AM on a Saturday) – once you have most of the liquid out mix the zucchini into the batter.

Your EVOO should be hot by now (you’ll see ripples in the oil when it’s ready) so go ahead and drop blobs of the batter down to fry – I didn’t measure mine but I’d say each cake is about 1/3 cup of batter. Press down on them gently with a flipper and give them 2-3 minutes per side to brown up and heat through. Transfer the cakes to a plate lined with paper towel and begin the next batch (I did about 4 cakes at a time as that is all my pan would hold).

Your Corn & Zucchini Cakes are ready to eat! These make a great Meatless Monday option or a side to any dish you like. You could also make them smaller and serve them as appies. I topped mine with a spoonful of ricotta and a sprinkle of chives.

Corn and Zucchini Cakes2

Cheers!

The Last of Summer Peachy Keen Salad Rolls & Spicy Peanut Dipping Sauce

I know it’s officially September which means that it’s time for warm, homey flavours; flavours that make you picture yellow leaves gently falling to the grass as the cool fall wind blows across your face and you snuggle in a little deeper to your cozy knit scarf…well FUCK THAT, that’s what I say!

I’m not letting summer go without a fight my friends! Hold on to these last few moments of summer bliss with all your might, smell the fresh cut grass, let your toes enjoy a few more days of freedom in your flip flops, and for the love of God eat as much summer fruit as you can fit in your face.

Too melodramatic? Perhaps. Regardless, here is my suggestion to help you use up some of that summer deliciousness:

The Last of Summer Peachy Keen Salad Rolls & Spicy Peanut Dipping Sauce

Makes 15 – 20 Rolls

Salad Rolls

*Not the best picture, they were very pretty in person

For the Peachy Keen Salad Rolls:

  • 1 Package of Rice Paper (find in the Asian food aisle of any grocery store)
  • 2-3 Peaches, Thinly Sliced
  • Mint Leaves
  • Basil Leaves
  • 2 Lg. Carrots, Shredded
  • ½ Head of Purple Cabbage,Thinly Sliced
  • 1 Red Pepper,Thinly Sliced
  • 1 Yellow Pepper, Thinly Sliced
  • 5 Green Onions, Sliced
  • Anything else you like! Cucumber, bean sprouts, avocado, radish, ANYTHING!

For the Spicy Peanut Dipping Sauce:

  • 2 Heaping Tbsp on Peanut Butter (I like to use natural PB)
  • 2 Tbsp. Low Sodium Soy Sauce
  • ½ tsp. Sesame Oil
  • Zest and Juice of ½ an Orange
  • 1 tsp. Rice Wine Vinegar
  • 1 Tbsp. Honey
  • Sriracha – as much as you think you can handle

The easiest way to hammer out these salad rolls is to make a bit of an assembly line so first prep all the veggies; shred the carrot (on a box grater or with a food processor), thinly slice the peaches, purple cabbage, peppers, and green onions.

Once you have all the veggies ready to go get yourself a clean work surface/cutting board and lay out on that a clean dish towel. Fill a baking dish with warm (closer to hot) water and it’s GO TIME! Place a sheet of rice paper in the water and let it soak for 10-20 seconds, ensure all of the paper is submerged – you’ll feel it become pliable but don’t let it get too soft.

Lay your softened rice paper on the clean dish towel and begin stuffing! For these I started with 2 slices of peach alternating with a mint leaf and then a basil leaf (start the roll in the first 3rd of the paper – closest to you) then layer in the cabbage, carrots, peppers, and green onion (and any other ingredients you feel like tossing in).

Now you just have to roll these bastards and that will be the tricky part! You have to be a little gentle with rice paper but if it tears it’s not a biggie! So pull the end closet to you up and over the stuffings and then take the sides and fold then in towards the middle tucking in any stray toppings as you go – then you just roll the bundle away from you to complete the wrap – just like a burrito!

To make the Spicy Peanut Dipping Sauce I just blend (or whisk) all ingredients until smooth – bada bing bada boom – you’re done!

Enjoy these immediately or store in the fridge for up to 2 days and don’t forget to savour these last few bites of summer because pumpkin spice season is now upon us!

Adventures in Sweden: Stockholm Food Tour

You know what I love more than eating and drinking in my beloved YEG; eating and drinking in my new favorite city, Stockholm! (Just jokes YEG, you’re still my fave!)

The Ol’ Ball & Chain and I had the opportunity to travel to Sweden for a wedding and although prior to our adventure neither of us had any particular inclination to visit Stockholm, it fit perfectly with our itinerary and boy am I glad it did!

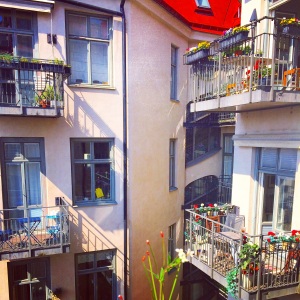
Stockholm is an amazing city full of life, with vibrant cityscapes that highlight both the old and new of the area. I fell in love almost instantly! It also helped that we stayed in an incredible apartment in an amazing location – thanks again Johanna & Moa for hosting us!

Stockholm

Obviously I wasn’t about to go half way around the world and not dive head first into the food culture so  I looked into food tours in the area and purchased tickets with Food Tours Stockholm and let me tell you that food tour was one of the highlights of our trip! We were lucky enough to have THREE fabulous guides and we visited several incredible locations during the 4 hour walking tour. The only unfortunate thing is that I did not take very detailed notes while we were actually on the tour and now a few weeks later some of the details escape me but here is a recap of the day as I remember it.

Ostermalm Market

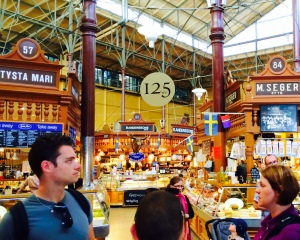
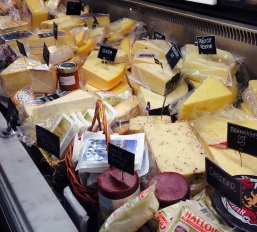
We started off meeting at Östermalm’s Food Hall, which is a very high end food market (and one of Jamie Oliver’s favourite places to shop) that is practically overflowing with artisan treats. In the market we visited Husmans Deli for a sampling of cheeses (although cheese for breakfast is a little unusual for Canadians, it’s actually very common in Sweden and Europe in general)

Cheese

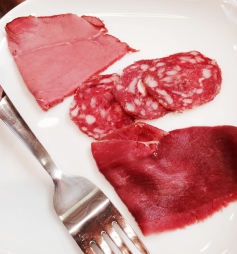
and then moved on to Fågel og vilt specialisten, the markets bird and game specialists to try out some cured meats, including elk and reindeer, oh and a beer, because why not.

Meat

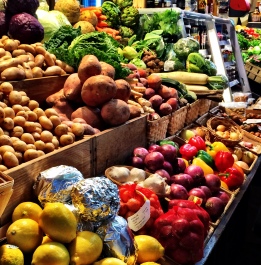
Our last stop at the market was a fresh fruit and veggie stand where we tried Swedish strawberries. I know what you’re thinking, “Swedish strawberries? So, normal, exactly the same as Canadian strawberries, right?”, WRONG! These strawberries grow in nearly 24 hours on sunlight (in the Northern region of Sweden) and therefore have incredible sweetness and…strawberry-ness. Trust me, they are unbelievable and now eating ‘normal’ strawberries just isn’t as good

FruitVeg

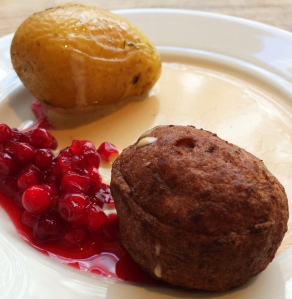
Next we wandered the streets of Östermalm until we arrived at our next destination Ingelsta Kalkon, which I’m told in English roughly translates to ‘happy turkey’. Turns out turkey is really taking off with the Swedes, who are notorious health fiends. During our visit we were treated to their take on Swedish meatballs made with ground turkey, delicious!

Meatball

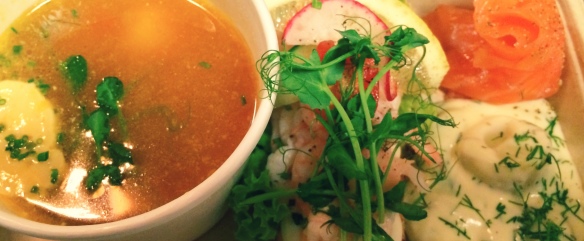
Off we went again in search of our lunch venue, Restaurant K25 a very unique style of restaurant. K25 is like a hybrid of a food court and high end restaurant. Inside K25 there are several restaurants that serve up gourmet food cafeteria style for dine-in or take away. Our lunch was a very traditional plate of saffron seafood soup (LOADED with a variety of seafood), an open faced shrimp sandwich with boiled egg, delicious gravlax, boiled potatoes in béchamel (the Swedes love them some béchamel!), and a glass of wine or beer to wash it all down with!

Lunch

This also provided us a great opportunity to chat a little more with one of our guides, Gunilla Blixt, a chef, accomplished food writer, and all around lovely human being. Gunilla told us all about traditional Swedish foods and our new favorite tradition, fika, which is basically a coffee break that can occur at any time simply because you want to have a break or a visit with friends – how cool is that!

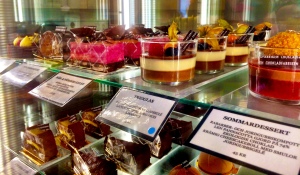
After an incredible (and filling) lunch we continued our tour, walking through the bustling city streets and stopping to wander through markets, historical squares, and to discuss some of Stockholm’s landmarks. We entered another food hall, this one I can’t recall the name of but we stopped in at a speciality store called P&B Delikatesser to try their Cloudberry Jam and check out their incredible assortment of oil, spices, and liquorice (turns out black liquorice is a big deal in Sweden, who knew?!). After walking a little further we soon made it to our next destination, Chokladfabriken. Chokladfabriken is a bakery/chocolate shop/ice cream bar so needless to say it smelled heavenly and on a 27 degree day we happily devoured some of their delicious ice cream (every single flavour had an element of chocolate in it (they’re famous for their chocolate), think white chocolate raspberry ice cream…oh yeah!).

Dessert

You might think at this point that the tour would wrap up and we could go on our merry way, but you would be wrong, AGAIN! Man, twice in one blog post…  how embarrassing for you!

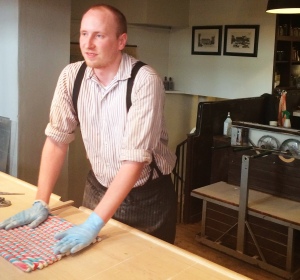
We forged on with full bellies towards the streets of the old town, Galma Stan, where the streets are cobblestone and narrow and lined with cafes and bars just begging you join them for fika. Our first stop in Galma Stan was a candy factory called, Polkapojkarna famous for its peppermint candy. Apparently candy canes or peppermint sticks were invented in Sweden by a woman trying to help her ill daughter feel better (don’t quote me on these details OK, if you want to know the whole story you’ll have to hop on a plane to Stockholm and take the tour yourself!). And at Polkapojkarna the candies are still made the traditional way – by hand. Although, now they make a variety of flavours, including the one we got to try: American Cola (ironic?).

Candy

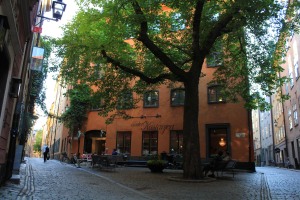
Our final location brought us to a beautiful square in the heart of Galma Stan where a local musician was playing a beautiful piece of music on a keyboard set up just under a lush chestnut tree. Under Kastanjen (literally Under the Chestnut Tree) was our last stop where we were invited in for an afternoon fika. We enjoyed coffee, tea, and some pastries as we recapped our day with the guides and other tourist and although we were totally stuffed we couldn’t help but start thinking about where we might want to go for dinner…and that is how you know you have a severe and likely irreversible addiction to/passion for food.

 Under_kastanjen_i_Gamla_Stan_i_Stockholm_i_Sverige

Thank you again to Food Tours Stockholm for a truly memorable day! I am now deeply in love with Stockholm and all of its’ food offerings!

Cheers!